Welcome to the whirling world of Wood lathe projects, where imagination spins at high speed and creativity is the only safety measure you need (but let’s keep the goggles on just in case). Here, we’ll dive into a treasure trove of wooden wonders, from bowls that could hold the universe’s biggest spaghetti serving to pens that make even the dullest notes seem like Shakespearean verses.
Whether you’re a seasoned wood whisperer or a curious novice, this guide will unravel the art of lathe work, list the essential tools, share techniques that make your finished pieces shine brighter than a new penny, and show you how to integrate your impressive creations into home decor that would make even your mother-in-law nod in approval.
Popular Wood Lathe Projects
Wood lathe projects are the perfect blend of creativity and craftsmanship, allowing woodworkers to transform a simple block of wood into stunning functional art. Whether you’re a seasoned lathe master or a budding enthusiast, the journey of shaping wood is as rewarding as it is entertaining. Let’s dive into some popular wood lathe projects that will surely turn your head – and some wood too!
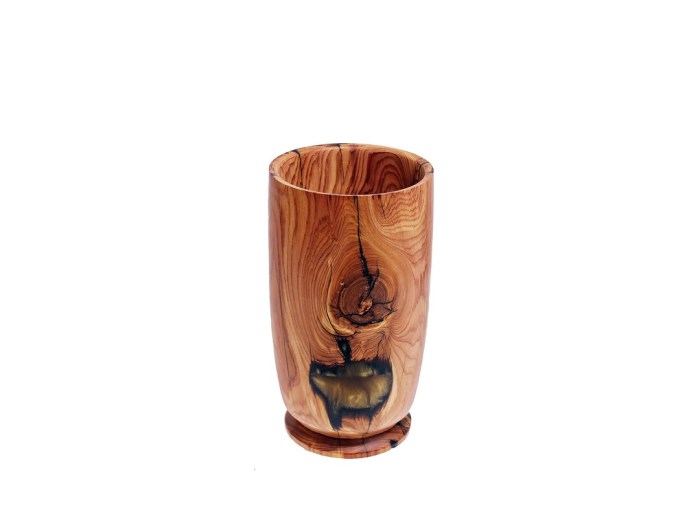
Creating a Wooden Bowl
Crafting a wooden bowl on a lathe can be as delightful as eating cereal out of it! The process typically involves selecting the right wood, mounting it securely, and then letting your lathe work its magic. Here’s a step-by-step guide to get those creative juices flowing:
1. Choose Your Wood
Hardwoods like maple, cherry, or walnut are excellent choices for a durable and beautiful bowl.
2. Prepare the Blank
Cut the wood into a rough blank—a cylinder that’s slightly larger than the desired bowl size.
3. Mount the Blank
Secure the blank on the lathe using a faceplate or a chuck. Ensure it’s tight; you don’t want it to fly off like a disgruntled turkey!
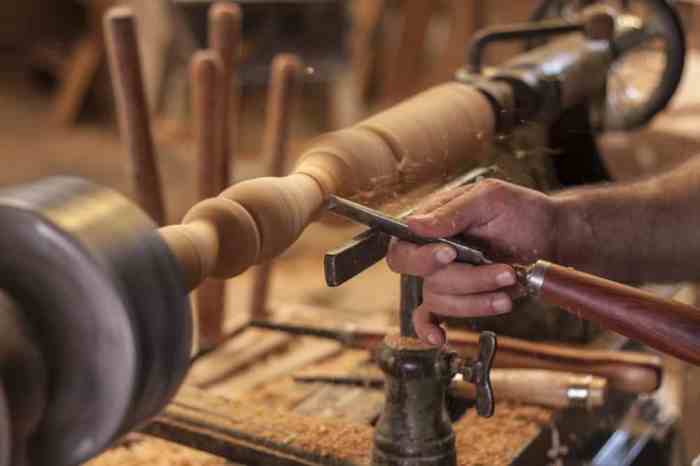
4. Shape the Outside
Turn on the lathe and use a roughing gouge to shape the outer dimensions of the bowl. It’s like giving the wood a haircut—only less judgmental.
5. Hollow the Inside
Switch to a bowl gouge and carefully create the interior of the bowl. Take your time; we’re not in a race here (unless you’re being chased by a bear).
6. Sand and Finish
Once the bowl is shaped, sand it smooth and apply your finish of choice to protect the wood and enhance its natural beauty.The satisfaction of holding a handcrafted bowl is akin to finding an extra fry at the bottom of the bag—pure joy!
Crafting a Wooden Pen
Turning a wooden pen is a delightful project that combines precision and artistry. It’s perfect for those who want to create a personalized writing instrument that’s both functional and stylish. Here’s how to get started on your pen-turning adventure:
Gather Supplies
You’ll need a pen kit, a pen blank (choose your favorite wood), and basic lathe tools.
Cut the Blank
Trim the pen blank to the size specified by the pen kit, allowing for some extra length for sanding.
Drill
Use a drill press to create a hole down the center of the blank. This is where the pen mechanism will fit, so aim for accuracy—no one likes a wobbly pen!
Mount and Shape
Secure the blank on the lathe and begin shaping it with a spindle gouge. Think of it as sculpting a small, elegant masterpiece.
Sand and Finish
Sand the pen to a smooth finish, then apply an appropriate finish. The right polish can make your pen shine brighter than your hopes for winning the lottery.
Assemble
Finally, assemble the pen kit according to the instructions, and voilà! You’ve got a writing tool that’ll impress even the most discerning of scribblers.
Turning Unique Candle Holders
Creating unique candle holders on a lathe is a great way to illuminate your space while showcasing your craftsmanship. Candle holders can be simple or elaborate, and here are some ideas to spark your creativity:
Spiral Candle Holder
A spiral design adds a dynamic flair to your holder. Start with a typical cylindrical shape and use a parting tool to create the spiral groove.
Multi-Holder Cluster
Why settle for one candle when you can have a whole family? Create a base with multiple holders of varying heights for a whimsical effect.
Nature-Inspired Designs
Incorporate elements of nature by leaving the bark on one side or carving leaf patterns into the wood. It’s like having a mini forest on your table!
Geometric Shapes
Experiment with different geometric shapes for a modern look. Triangular, hexagonal, or even asymmetrical designs can bring a fresh vibe to your decor.Before you start turning, remember to think about stability and safety. A well-balanced candle holder is not just a treat for the eyes—it’s also a fire safety necessity, unless you enjoy living life on the edge!
Essential Tools and Techniques for Woodworking
Welcome to the wonderful world of woodworking, where the phrase “measure twice, cut once” is as sacred as a well-seasoned piece of wood. Whether you are a seasoned craftsman or a newbie who thinks a lathe is something you do with your hair, having the right tools and techniques can turn your lumber into a masterpiece. Let’s dive into the essential tools and techniques that will have your wood spinning and your projects turning heads!
Must-Have Tools for Wood Lathe Projects
In the realm of woodturning, certain tools are as essential as coffee to a Monday morning. Here’s a rundown of the must-have tools that will make your lathe projects smoother than a freshly turned bowl:
- Wood Lathe: The heart of your operation. Choose a lathe with variable speed and a sturdy build to handle different projects without shaking like a chihuahua in a thunderstorm.
- Chisels and Gouges: A set of high-quality chisels and gouges will help you shape your wood like a sculptor molding clay. Look for various profiles like bowl gouges, spindle gouges, and parting tools.
- Tailstock and Tool Rest: These components keep your workpiece secure and support your chisels. Think of them as your loyal sidekicks, always there to assist you without stealing the spotlight.
- Calipers: To measure the diameter of your wood as you turn it. Because eyeballing it might just land you with a “creative” shape that resembles something from a modern art exhibit.
- Sandpaper and Abrasives: For achieving that silky smooth finish that makes your project feel like a baby’s bottom. A variety of grits will help you transition from rough to refined.
- Face Shield and Dust Mask: Your safety gear! Protecting your eyes and lungs is paramount. Remember, splinters and sawdust are not the accessories you want to rock!
Techniques for Achieving Smooth Finishes on Lathe-Turned Wood
Achieving a flawless finish on your lathe projects is akin to frosting a cake—you want it to look as good as it tastes! Here are some tried-and-true techniques to ensure your pieces shine like a diamond in a goat’s rear:
- Sharp Tools: Always keep your chisels sharp. Dull tools not only lead to tear-out but also require more force, which can lead to mishaps. A sharp tool is like a well-placed punchline—timely and effective!
- Proper Speed: Adjust the lathe speed according to the material and size of the workpiece. Too fast, and you might end up with a wood frisbee; too slow, and you might just bore yourself to sleep.
- Sanding Techniques: Start with a coarse grit and gradually work your way to finer grits. Sanding with the grain is key! If you go against the grain, you’ll be left with a surface that’s rougher than your uncle’s jokes at family gatherings.
- Finishing Products: Consider using oils, waxes, or lacquers once you finish sanding. Each product adds a different level of shine and protection, much like your mom’s secret recipe for happiness.
- Sealing Wood: Applying a sealant helps protect your project from moisture and wear. It’s like putting a raincoat on your wood—because nobody likes soggy wood!
Safety Measures and Best Practices When Using a Wood Lathe
Woodworking can be a fun and rewarding hobby, but safety must always be your first concern. Here are some essential safety measures to keep your fingers intact and your projects thriving:
- Personal Protective Equipment (PPE): Always wear a face shield and a dust mask. You want to look like a woodturning superhero, not the star of an accidental splinter horror movie.
- Check for Secure Mounting: Ensure that your workpiece is securely mounted before turning the lathe on. A loose piece can turn your masterpiece into a projectile faster than you can say “timber!”
- Maintain a Safe Distance: Keep your hands and body parts away from the lathe while it’s in motion. Your digits are not meant to be seen as “expendable” in your projects!
- Stay Focused: Avoid distractions while using the lathe. This is not the time to be trying to multitask like you’re a circus performer. Keep your eyes on the project, not on your phone!
- Proper Lighting: Ensure your workspace is well-lit. You don’t want to be turning wood in the dark unless you’re auditioning for a woodworking-themed horror flick.
Integrating Wood Lathe Projects into Home Decor
Welcome to the world of wood lathe magic, where your imagination meets the whir of spinning wood! Integrating your lathe projects into home decor transforms ordinary spaces into extraordinary havens of creativity. Picture this: a sleek, turned vase cradling fresh flowers, or a whimsical candle holder that gets guests buzzing about your DIY prowess. Let’s embark on a journey to discover how you can elevate your home decor game with stunning wood lathe creations!
Incorporating Lathe Projects into Home Improvement Designs
Bringing wood lathe creations into your home improvement designs adds a unique touch that can make even the most mundane spaces sing. Think of your lathe as a magic wand, capable of turning plain wood into eye-catching masterpieces. Here are some essential tips and ideas to help you infuse lathe projects into your decor seamlessly:
- Accent Pieces: Utilize turned bowls or sculptures as centerpieces on coffee tables or dining tables. A well-placed lathe project can become a conversation starter, especially if you’ve added a unique finish or color.
- Functional Art: Create functional decor items such as coat racks or key holders that not only serve a purpose but also showcase the beauty of turned wood. Imagine a coat rack shaped like an abstract tree, welcoming guests with a blend of art and function.
- Textured Wall Art: Use smaller turned pieces to create a stunning wall display. Arrange them in patterns or frames for a modern art installation that’s sure to impress. This gives a personal flair that mass-produced art simply cannot match.
Designing Custom Furniture Using Lathe Techniques
Designing custom furniture with lathe techniques allows you to create unique pieces tailored to your style and space. It’s like being a mad scientist in a woodshop, concocting your one-of-a-kind designs! Here’s a guide to get your creative juices flowing:
- Table Legs: Start with the legs of tables or desks. Turned legs can add elegance and character. Think of a classic round table with intricately turned legs resembling spirals; it could be the showstopper in your dining room.
- Chair Backs: Incorporate turned elements into the backrest of chairs. Imagine a dining chair with gently curved, turned wooden slats creating both comfort and visual interest.
- Drawer Pulls: Transform your cabinetry by creating custom turned drawer pulls. These small touches can elevate the overall aesthetic of the furniture, making even the most basic drawers look luxe!
Using Turned Wood Pieces in Feng Shui Arrangements
Turned wood pieces can enhance the energy flow in your home as part of Feng Shui arrangements. The natural curves and organic shapes of turned wood promote harmony and balance. Incorporating these pieces isn’t just about aesthetics; it’s about creating a welcoming and positive environment. Here’s how to effectively use turned wood in your Feng Shui designs:
- Placement: Position turned wooden vases in the wealth corner of your home (the far left corner from your front door) to attract prosperity. Fill them with fresh flowers or bamboo for added vibrancy.
- Balance Elements: Use turned wood pieces to balance out sharp angles in your space. Rounded shapes can soften the impact of hard edges, contributing to a more peaceful atmosphere.
- Natural Textures: Incorporating different types of turned wood introduces natural textures, which enhance the Earth element in Feng Shui. Consider using items like wooden sculptures or bowls to ground your space.
Final Summary
In summary, Wood lathe projects are more than just a way to pass the time; they’re a delightful journey into craftsmanship and creativity that can transform bland wood into stunning pieces of art. So, whether you’re crafting a candle holder that doubles as a conversation starter or a bowl that could rival any fruit basket, remember that the only limit is your imagination (and maybe your workshop’s power supply).
Happy turning!
Commonly Asked Questions
What is the best type of wood for lathe projects?
Softwoods like pine and cedar are great for beginners, while hardwoods like maple and cherry are perfect for more experienced projects.
Do I need special tools for wood lathe projects?
Absolutely! A lathe, chisels, safety gear, and a good finishing tool are essential for smooth sailing.
How do I maintain my wood lathe?
Regular cleaning, lubrication, and checking for wear and tear will keep your lathe purring like a well-fed cat.
Can I use a wood lathe for metal projects?
Technically, yes, but it’s like trying to use a spoon to eat soup when you have a fork – it’s possible but not advisable!
Are there any safety tips for using a wood lathe?
Always wear goggles, keep your hair tied back, and avoid wearing loose clothing that could take a spin on the lathe’s dance floor!